Je vous remercie. J'espère que le partage de mon expérience dans la construction des autres modèles profitera de mes erreurs et suggère des améliorations et être en mesure de faire quelque chose d'encore mieux.
Paul
Les Forums de Passions Métrique et Etroite !!
Rendez vous des passionnés des trains à voie étroite ou métrique, qui souhaitent un endroit pour discuter, pour se rencontrer, sans se prendre la tête et dans la bonne humeur !
Worsley Works Billard BR150 - construction by Paul T
Modérateur: SteamyStef
Re: Worsley Works Billard BR150 - construction by Paul T
![]() par Paul T » 16 03 2016 à 11:50
par Paul T » 16 03 2016 à 11:50
-
Paul T - Messages: 213
- Enregistré le: 08 12 2013 à 22:40
- Localisation: près de Manchester.
Re: Worsley Works Billard BR150 - construction by Paul T
![]() par YVES » 17 03 2016 à 10:10
par YVES » 17 03 2016 à 10:10
Joli travail !

Une entreprise qui n'a jamais acheté une Corpet neuve !!! Est-ce bien une compagnie ferroviaire sérieuse ?!...
- YVES
- Messages: 20498
- Enregistré le: 09 03 2008 à 21:06
- Localisation: Picardie
Re: Worsley Works Billard BR150 - construction by Paul T
![]() par Paul T » 17 03 2016 à 14:27
par Paul T » 17 03 2016 à 14:27
Merci Beyer-Garratt & Yves.
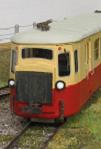
Deux photos plus.
La première montre le bogie moteur maintenant avec des cadres et une traverse attachée. Les nouvelles boîtes d'essieu ont été fabriqués à partir de la carte plastique. Une fois que ce sont peints l'illusion sera complète je l'espère. Les progrès sur tous les fronts!
Le second comme un encouragement. Le Billard arrive à Annascaul, traversant un petit ouvrage d'art. La remorque donnera le train plus de présence, importante lorsque la section panoramique de la mise en page est un peu plus de 3 mètres de long.
Meilleurs voeux,
Paul
Thank you Beyer-Garrat & Yves.
Two more photos.
The first shows the motor bogie now with frames and a cross piece attached. The new axle boxes were fabricated from plastic card. Once this are painted the illusion will be complete I hope. Progress on all fronts!
The second as an encouragement. The Billard arrives at Annascaul, crossing a petit ouvrage d'art. The remorque will give the train more presence, important when the scenic section of the layout is just over 3 metres long.
Best wishes,
Paul
- Fichiers joints
-
Bogie moteur avec des cadres/Motor bogie with frames. -
Billard & remorque approche Annascaul/Billard & remorque approach Annascaul.
 Vu 6385 fois")
 Vu 6388 fois")
-
Paul T - Messages: 213
- Enregistré le: 08 12 2013 à 22:40
- Localisation: près de Manchester.
Re: Worsley Works Billard BR150 - construction by Paul T
![]() par Storm » 17 03 2016 à 14:59
par Storm » 17 03 2016 à 14:59
Bonjour Paul, d'où vient ce bogie moteur?
Storm NORRIS B.A. Addict
-

Storm - Bifidus Actif en vacances

- Messages: 23116
- Enregistré le: 24 04 2006 à 23:54
- Localisation: Vesly (27)
Re: Worsley Works Billard BR150 - construction by Paul T
![]() par YVES » 17 03 2016 à 22:05
par YVES » 17 03 2016 à 22:05
J'aurais dit Black Beetle (moins connu que les Bullant chez nous) :
http://motorbogies.com/index.php?main_p ... cPath=1_24
Mais, je n'en suis plus aussi certain.
Belle ambiance dans le décor.
http://motorbogies.com/index.php?main_p ... cPath=1_24
Mais, je n'en suis plus aussi certain.
Belle ambiance dans le décor.
Une entreprise qui n'a jamais acheté une Corpet neuve !!! Est-ce bien une compagnie ferroviaire sérieuse ?!...
- YVES
- Messages: 20498
- Enregistré le: 09 03 2008 à 21:06
- Localisation: Picardie
Re: Worsley Works Billard BR150 - construction by Paul T
![]() par Storm » 18 03 2016 à 00:47
par Storm » 18 03 2016 à 00:47
Je ne pense pas non 
Storm NORRIS B.A. Addict
-
Storm - Bifidus Actif en vacances
- Messages: 23116
- Enregistré le: 24 04 2006 à 23:54
- Localisation: Vesly (27)
Re: Worsley Works Billard BR150 - construction by Paul T
![]() par Beyer-Garrat » 18 03 2016 à 07:07
par Beyer-Garrat » 18 03 2016 à 07:07
Tout à fait, les Black Beetle étant en Ho et Paul T en 009.Je pense plutôt a un châssis N "retravaillé" fort bien d'ailleurs 
Retrouvez mes montages passés ou futurs sur ma chaine Youtube :
https://www.youtube.com/channel/UCFlT8znNgdMVARcDg51y8Zg
https://www.youtube.com/channel/UCFlT8znNgdMVARcDg51y8Zg
-

Beyer-Garrat - Laitons sont durs !
- Messages: 23720
- Enregistré le: 25 04 2006 à 08:22
- Localisation: En transit we trust !
Re: Worsley Works Billard BR150 - construction by Paul T
![]() par Paul T » 18 03 2016 à 23:40
par Paul T » 18 03 2016 à 23:40
Bonjour Storm,
Le mécanisme est un «Knightwing» pour 12 mm de calibre. Il a été initialement conçu pour 5.5mm = 1ft / 1h55 afin que le Knightwing Sentinel loco (00 / 1:76) pourrait être adapté à voie étroite avec cabine modifiée.
Mike Chinnery utilisé pour les construire - ce qui serait appelé «production artisanale» en France. Il a pris sa retraite. Je pense qu'il passe beaucoup de temps à aider le chemin de fer Ffestiniog maintenant.
J'ai acheté ce châssis de Malcolm Savage qui l'avait fait construire pour moi (pas sûr de qui cependant). Il fonctionne très bien et peut être recommandée, mais ... Je ne pense pas que Malcolm veut être impliqué avec le côté de la construction plus. Son état de santé ne sont pas si bon pour le moment. Je pense qu'il est prêt à vendre les pièces pour un être construit, mais ne suis pas sûr de ce qui est présent et ce qui doit être fourni. 12mm ensembles de roues de jauge sont un gros problème au Royaume-Uni pour le moment - ils sont devenus aussi rares que les dents de poule!
J'espère que cela aide.
Meilleurs voeux,
Paul
Hello Storm,
The mechanism is a 'Knightwing' for 12mm gauge. It was originally designed for 5.5mm = 1ft / 1:55 so that the Knightwing Sentinal loco (00 / 1:76) could be adapted for narrow gauge with modified cab.
Mike Chinnery used to build them - what would be called 'artisan production' in France. He has retired. I think he spends a lot of time helping the Ffestiniog Railway now.
I purchased this chassis from Malcolm Savage who had it built for me (not sure who though). It runs really well and can be recommended but ... I don't think Malcolm wants to be involved with the construction side any more. His health is not so good at the moment. I think he is prepared to sell the parts for one to be constructed but am not sure what is present and what needs to be provided. 12mm gauge wheel sets are a big issue in the UK at the moment - they have become as scarce as hen's teeth!
I hope this helps.
Best wishes,
Paul
-
Paul T - Messages: 213
- Enregistré le: 08 12 2013 à 22:40
- Localisation: près de Manchester.
Re: Worsley Works Billard BR150 - construction by Paul T
![]() par Paul T » 18 03 2016 à 23:48
par Paul T » 18 03 2016 à 23:48
See also viewtopic.php?f=6&t=8788&start=15
Les photos sont mieux/The photos are better.
Les photos sont mieux/The photos are better.
-
Paul T - Messages: 213
- Enregistré le: 08 12 2013 à 22:40
- Localisation: près de Manchester.
Re: Worsley Works Billard BR150 - construction by Paul T
![]() par Storm » 18 03 2016 à 23:54
par Storm » 18 03 2016 à 23:54
Thank you Paul  This mechanism seams very good I never heard about it and don't remember your photos
This mechanism seams very good I never heard about it and don't remember your photos Storm NORRIS B.A. Addict
-
Storm - Bifidus Actif en vacances
- Messages: 23116
- Enregistré le: 24 04 2006 à 23:54
- Localisation: Vesly (27)
Re: Worsley Works Billard BR150 - construction by Paul T
![]() par Paul T » 20 03 2016 à 18:33
par Paul T » 20 03 2016 à 18:33
Storm c'est compréhensible. Il y a beaucoup de choses sur le forum. Aussi je pense que la production est mesurée en dizaines, pas des centaines. Ce fut seulement une conversation décontractée avec Malcolm qui m'a fait prendre conscience du bogie moteur. J'espère qu'il peut créer un châssis en métal blanc à utiliser avec le Halling et Nightwing rognées dans la conversation!
Meilleurs voeux,
Paul
That is understandable Storm. There is a lot going on the forum. Also I would think that production is measured in tens, not hundreds. It was only a casual chat with Malcolm that made me aware of the motor bogie. I am hoping that he can create a white metal chassis to use with the Halling and the Knightwing cropped up in the conversation!
Best wishes,
Paul
-
Paul T - Messages: 213
- Enregistré le: 08 12 2013 à 22:40
- Localisation: près de Manchester.
Re: Worsley Works Billard BR150 - construction by Paul T
![]() par Paul T » 10 04 2016 à 21:39
par Paul T » 10 04 2016 à 21:39
Chers tous,
Je suis maintenant construit le toit. Ouf.
Pourquoi est-ce difficile? Eh bien, pour commencer avec la gravure en laiton est trop grande. Je devais déposer vers le bas - qui a pris un certain temps. Rappelez-vous tout cela est 1:76 échelle (4mm = 1ft, 13mm = 1 mètre). Je devais réduire la longueur de 158mm à 155.5mm (pas trop mal) et la largeur de 31mm à 27mm (beaucoup de travail dur). Fichier un côté pendant 30 secondes, retournez-le et déposer pendant 30 secondes. Puis tourner tout cela sur l'autre côté et continuer avec la même procédure ... encore et encore. Je ne parviens à garder les côtés parallèles de sorte qu'il valait la peine. Les dimensions seront différentes selon la construction, mais pas de beaucoup. Je continuais de vérifier la plaque de toit avec le corps pour faire en sorte que tout allait bien.
Les extrémités incurvées sont pas trop mauvais, les soins étant nécessaire pour assurer que le profil était bon.
Trop rendre la tâche plus difficile, je veux un toit qui est amovible, pour aider à installer vitrage, des sièges et des passagers - et les remplacer si / quand ils se détachent.
Utilisation de 3/32 inch balsa (environ 2 mm) je fis un insert pour le toit. Une fois terminé cela a été collé en place avec de la colle UHU. Sur la photo noter les petites découpes pour les portes. Je devais aussi chanfreiner la fin de la haute fenêtre pour que le balsa a été ne bloque pas la fenêtre.
Une fois le bloc de balsa a été collé en place et de temps pour que la colle vraiment définir ce fut l'occasion de vérifier l'ajustement. J'ai pu limer un peu plus près de la fenêtre se termine pour obtenir un meilleur profil.
Le toit a ensuite été faite en utilisant 3/16 inch balsa (environ 4 mm). Un bloc rectangulaire a été collée en place (à nouveau avec UHU) et quand définir le profil du toit a été soigneusement poncé en utilisant du papier de verre fin.
La tâche suivante est de donner le toit plusieurs couches de peinture d'apprêt (Humbrol n ° 1) et d'une amende nettoyer entre certains manteaux.
La construction de base est maintenant terminée. Hourra!
Meilleurs voeux,
Paul
Francis par Google translate
Dear all,
I have now constructed the roof. Phew.
Why is this difficult? Well to start with the brass etch is too large. I had to file it down - which took some time. Remember this is all 1:76 scale (4mm = 1ft, 13mm = 1metre). I had to reduce the length from 158mm to 155.5mm (not too bad) and the width from 31mm to 27mm (a lot of hard work). File one side for 30 seconds, turn it around and file for another 30 seconds. Then turn it all over to the other side and continue with the same procedure ... over and over again. I did manage to keep the sides parallel so it was worth it. The actual dimensions will differ according to construction, but not by much. I kept checking the roof plate with the body to make sure that all was going well.
The curved ends were not too bad, care being needed to ensure that the profile was good.
Too make the task more difficult I want a roof that is removable, to help install glazing, seating and passengers - and replace them if/when they come loose.
Using 3/32 inch balsa (about 2mm) I made an insert for the roof. When completed this was glued in place with UHU glue. On the photo note the small cut outs for the doors. I also had to chamfer the end with the high window so that the balsa was not blocking the window.
Once the balsa block was glued in place and time left for the glue to truly set it was a chance to check the fit. I was able to file off a little more by the window ends to get a better profile.
The roof was then made using 3/16 inch balsa (about 4mm). A rectangular block was glued in place (again with UHU) and when set the roof profile was carefully sanded down using fine glass paper.
The next task is to give the roof several coats of primer paint (Humbrol No 1) and a fine clean up between some coats.
The basic construction has now been completed. Hurrah!
Best wishes,
Paul
- Fichiers joints
-
Toit en laiton en place./Brass roof in place. -
Insert de balsa pour le toit. Remarque encart pour porte et chanfrein pour la fin./Balsa insert for roof. Note inset for door and chamfer for end. -
Remorque avec toit en balsa./Remorque with balsa roof.
.JPG "IMG_7254 (2).JPG (257.42 Kio) Vu 6145 fois")
 Vu 6145 fois")
 Vu 6145 fois")
-
Paul T - Messages: 213
- Enregistré le: 08 12 2013 à 22:40
- Localisation: près de Manchester.
Re: Worsley Works Billard BR150 - construction by Paul T
![]() par Beyer-Garrat » 11 04 2016 à 22:57
par Beyer-Garrat » 11 04 2016 à 22:57
Hello Paul
J'ai eu le même problème en fait en mesurant sur le plan le toit est.à la bonne taille si on adapte la caisse
au châssis elle n'est pas assez large il manque 5mm..
Le balsa pour le toit est une excellente solution
J'ai eu le même problème en fait en mesurant sur le plan le toit est.à la bonne taille si on adapte la caisse
au châssis elle n'est pas assez large il manque 5mm..
Le balsa pour le toit est une excellente solution
Retrouvez mes montages passés ou futurs sur ma chaine Youtube :
https://www.youtube.com/channel/UCFlT8znNgdMVARcDg51y8Zg
https://www.youtube.com/channel/UCFlT8znNgdMVARcDg51y8Zg
-
Beyer-Garrat - Laitons sont durs !
- Messages: 23720
- Enregistré le: 25 04 2006 à 08:22
- Localisation: En transit we trust !
Re: Worsley Works Billard BR150 - construction by Paul T
![]() par pelican » 12 04 2016 à 08:20
par pelican » 12 04 2016 à 08:20
ça promet 
Pélican, Soixantologue (© by Pélican ..) Plus jamais de Hom
PME LE forum des voies Etroites et Métriques
petit train de la Scarpe
PME LE forum des voies Etroites et Métriques
petit train de la Scarpe
-

pelican - Chuck Squad, chenapan
- Messages: 48691
- Enregistré le: 25 04 2006 à 08:19
- Localisation: Thimeon
Re: Worsley Works Billard BR150 - construction by Paul T
![]() par Paul T » 15 04 2016 à 21:51
par Paul T » 15 04 2016 à 21:51
Beyer-Garratt et Pelican vous remercie pour vos commentaires encourageants. Le toit a eu 6 couches de peinture - 3 plus (ou presque) pour aller!
Je pense que la saine choisirait de faire le toit de carte en plastique - il pourrait être beaucoup plus facile. Je trouve difficile à utiliser si. Je fis la vie plus difficile en voulant qu'il soit amovible.
Plus de photos bientôt.
Meilleurs voeux,
Paul
French translation - usual suspect translator
Beyer-Garrat and Pelican thank you for your encouraging comments. The roof has now had 6 coats of paint - 3 more (or so) to go!
I think the sane would choose to make the roof out of plastic card - it could be a lot easier. I find it hard to use though. I made life more difficult by wanting it to be removable as well.
More photographs soon.
Best wishes,
Paul
-
Paul T - Messages: 213
- Enregistré le: 08 12 2013 à 22:40
- Localisation: près de Manchester.
Retourner vers Votre matériel, vos acquisitions, vos placards !
Qui est en ligne
Utilisateurs parcourant ce forum : Aucun utilisateur enregistré et 38 invités